1. This site uses cookies. By continuing to use this site, you are agreeing to our use of cookies. Learn More.

Tutorial RuneMate Subversion (SVN) Guide - Publish to the Bot Store

Discussion in 'Tutorials & Resources' started by Arbiter, May 6, 2014.

  1. Arbiter

    Arbiter Mod Automation

    Joined:
    Jul 26, 2013
    Messages:
    2,937
    Likes Received:
    1,266
    RuneMate Subversion Guide
    Here at RuneMate, we utilize subversion to allow devs to one-click deploy their bots to the Bot Store and for us to take advantage of the incremental updates to speed up manual approval. Although the benefits speak for themselves, we are aware that there can be a slight learning curve when getting started with version control. For starters, I would advise briefly skimming through the Wikipedia articles linked above to better understand what you are doing and why it is in your best interest long term.

    Section A: Opening Your RuneMate SVN Account

    1) Head to the Developer Panel where you will see the following page:

    [​IMG]
    2) Hit the "Get Started" button and you will be shown a screen like this:
    [​IMG]
    3) Be sure to read the instructions provided and save your username/password/project URL combination somewhere safe. Navigating to this page in the future will show your username and project URL, but NOT your password (for obvious security reasons). Your have now successfully created your personal RuneMate SVN account!

    Section B: Downloading Subversion Binary Packages and Command Line Tools
    Note: This step may be optional depending on your IDE and OS, but for the sake of keeping this guide as universal as possible it is highly recommended and may prevent many errors down the road. However, if you use OSX you can safely skip this step; OSX packages subversion binaries with release.

    1) Windows ONLY: The easiest way to ensure you have the binaries required as well as a cool interface for independent (non-IDE) version control is to install TortoiseSVN. Unfortunately it is Windows only, so other operating systems will have to find an alternative (below). Additionally, if you do not wish to install the interface there are other options available by following the Non-Windows instructions below.

    Note: Make sure that the "command line client tools" option is selected to install. It must look exactly as it does in the image.

    [​IMG]

    Non-Windows: Following the provided steps for your operating system, download and install the subversion binary packages.

    2) Fresh system boot will most likely be needed for the new binary packages to be loaded. Restart to be safe.

    Section C.1: Setting up IntelliJ
    Note: For the following sections only follow the instructions applicable to your IDE/environment.

    1) Depending on where you are in the development process you will pick one of the following options at the IntelliJ setup prompt. Read below to figure out which choice is right for you.

    [​IMG]


      • Create New Project: If you are starting a project from scratch (i.e. you haven't written any code for RuneMate yet and no project exists yet)
      • Open Project: If you have an existing project with bot code that you have been using with RuneMate
      • Check out from Version Control: If you have previously set up your SVN account and successfully committed code to it (i.e. you are using this guide to re-setup SVN, not configure it for the first time)
        • Explicit instructions/instructions for this last option will not be provided as it follows the same logic as the other options.
    2) Create a new project (following typical IntelliJ instructions) or open the existing project. Navigate to Menu -> VCS -> Enable Version Control Integration...
    [​IMG]
    3) In the prompt that pops up, select "Subversion."
    [​IMG]
    4) Now when you go to Menu -> VCS, you will have many more options. Select "Checkout from Version Control" -> Subversion.
    [​IMG]
    5) Add a new repository and enter the project URL you saved in Section A. Then select that repository and click Checkout.
    [​IMG]
    6) Choose the path to your project as the Destination Directory. Using the default settings (as in the image below) should be fine.
    [​IMG]
    7) Select 1.8 format for the Subversion working copy.
    [​IMG]
    8) Enter the authentication information (username/password) you saved in Section A. Open the checked out project.
    [​IMG]
    9) Right click any package/class/file in your project and go to Subversion -> Add (as a test to make sure the set-up is working properly).
    [​IMG]
    10) Note that the package/class/file you chose to add is now green (signifying new file in working copy to be added to SVN) as opposed to red (file in working copy to be ignored and NOT added to SVN). Now go to VCS -> "Commit Changes..."
    [​IMG]
    11) In the green box are the working copy changes to be committed to the server. In blue is info on commit message recommendation. In orange, are recommended settings for pre- and post-commit processing. Finally, in yellow is the Commit button to push your changes.
    [​IMG]
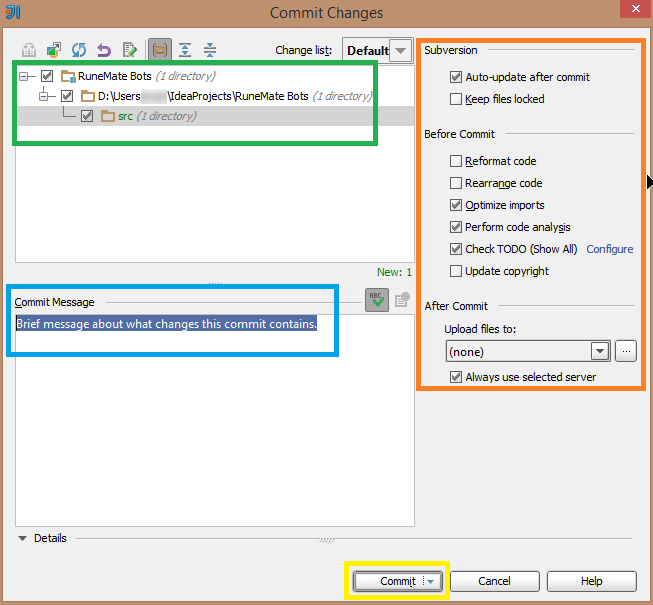
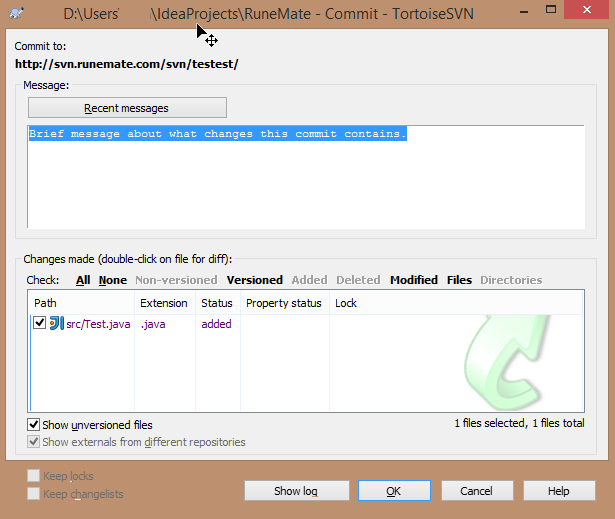
    12) Upon successful commit you will receive a pop-up along these lines:
    [​IMG]
    Congratulations, you have made your first successful commit! Follow the logic above to commit all the code necessary for your bot. When you are ready to release to the public continue on to Section D.

    Section C.2: Setting up Eclipse
    Note: For the following sections only follow the instructions applicable to your IDE/environment.

    Refer to Tutorial - Setting up Eclipse for RuneMate.

    Section C.3: Using TortoiseSVN to Commit Independently
    Note: For the following sections only follow the instructions applicable to your IDE/environment.

    Although I recommend an IDE integrated solution, sometimes things don't work out ideally. As a back-up option, you can always use the TortoiseSVN client (as installed in Section B) to commit to your project directly.

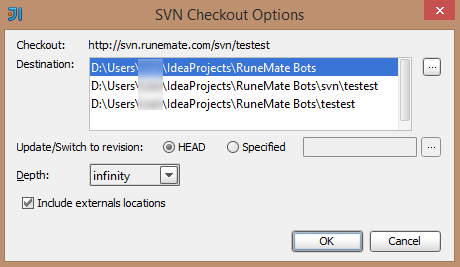
    1) Navigate to your project folder -> Right Click -> SVN Checkout.

    [​IMG]
    2) Enter your project URL as saved in Section A.
    [​IMG]
    3) Your project folder should now have a checkmark beside it [​IMG] (signifying that it is updated and has no working copy changes to commit.

    4) As a test, create a new file, right click it -> TortoiseSVN -> Add.

    [​IMG]
    5) Now go back to your project root directory and you will notice there is a red exclamation mark [​IMG] beside the folder now. This signifies that the working copy has changes ready to be committed. Right click the project root directory -> "SVN Commit..."
    [​IMG]
    6) Fill out the prompt and press OK.
    [​IMG]
    7) Congratulations, you have made your first successful commit! Follow the logic above to commit all the code necessary for your bot. When you are ready to release to the public continue on to Section D.
    [​IMG]
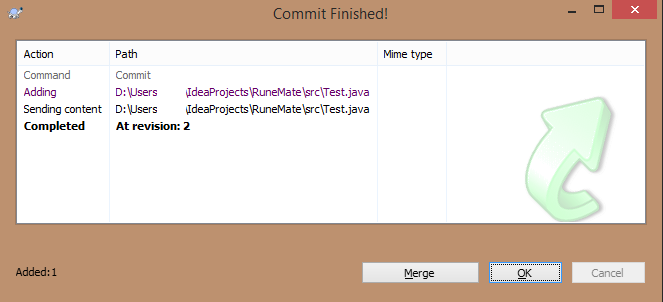
    Section D: Pushing Bot Releases to the Bot Store

    1) Provided that you have completed sections A through C and committed all the necessary code to your personal SVN, you are ready to push your beautiful bot to the public. In order to do this simply navigate to the Developer Panel and press "Push Bot Update."

    [​IMG]
    2) Once we have promptly reviewed the code you will receive a private message on the forum informing you of its status.


    Appendix A: Troubleshooting SVN on OSX
    Courtesy of @Eagles13

    If you encounter any of the following errors on OSX whilst attempting to set up SVN for IntelliJ and RuneMate, these are some potential solutions:


    "Error updating changes: svn: E155021: The client is too old to work with the working copy at "..." (format 31)."
    [​IMG]

    This error can occur when you're importing a project from a computer where you've used a newer version of SVN to the one installed by default on Yosemite or Mavericks (the ones installed on mavericks are usually v1.6 or v1.7). If you have this problem, you'll need to download, compile, and install a newer version of SVN, as pre-compiled binaries are all but impossible to find. Steps to complete:


    1. Download & install XCode as it will be required to further progress.
    2. Use this really great tutorial here in order to download, compile & install the latest version of SVN for OSX.
    3. Open a terminal window, and use "svn --version" to verify that the install has completed successfully.
    4. Open IntelliJ, and press Ctrl+, in order to open up the settings dialog. Use the search function in order to find Subversion settings. You will need to set the absolute path for the SVN binary, as IntelliJ will default to the previous installation otherwise. The new installation may be in /usr/local/bin. In order to find out for sure where the new SVN installation is:
    5. Open a new terminal window
    6. Type "echo $PATH"
    7. Check all of the directories in the output for the SVN binary.
    8. Once you have found the correct path for the updated version of SVN, click the "..."button on the SVN settings dialogue in order to change the default path:
      [​IMG]
    9. Use Cmd+Shift+G in order to bring up the "GoTo dialog" and select the correct path (which you found earlier).

    Appendix B: Common Issues

    [​IMG]

    This error occurs in the absence of SVN binaries. Please carefully repeat from Section B paying close attention to notes in a large font size and red in color. ;)
     
    #1 Arbiter, May 6, 2014
    Last edited: Apr 18, 2016
  2. Viewer

    Viewer Discretion is advised

    Joined:
    Jan 2, 2014
    Messages:
    306
    Likes Received:
    77
    Congratulations for the guide, it is very well done ;)
     
  3. Thunderkill

    Joined:
    Jan 31, 2015
    Messages:
    116
    Likes Received:
    24
    Awesome, i absolutely love that we have our own SVN here. No need to use github :p
     
  4. Dellgenius

    Joined:
    Dec 27, 2014
    Messages:
    287
    Likes Received:
    39
    Whats this? what do i do now. @Arbiter
    [​IMG]
     
  5. SlashnHax

    Joined:
    Dec 10, 2014
    Messages:
    3,198
    Likes Received:
    1,041
    Make sure you have the svn binaries. I used sliksvn
     
    Dellgenius likes this.
  6. Dellgenius

    Joined:
    Dec 27, 2014
    Messages:
    287
    Likes Received:
    39
    What is this binary thing and how do I get it. Is it that tortoise svn thing? Thanks
     
  7. Arbiter

    Arbiter Mod Automation

    Joined:
    Jul 26, 2013
    Messages:
    2,937
    Likes Received:
    1,266
    Emphasis on the note.
     
    Dellgenius likes this.
  8. Dellgenius

    Joined:
    Dec 27, 2014
    Messages:
    287
    Likes Received:
    39
    Oh... I derped. I feel embaressed now...
     
  9. Arbiter

    Arbiter Mod Automation

    Joined:
    Jul 26, 2013
    Messages:
    2,937
    Likes Received:
    1,266
    Don't be. You'd be surprised how many people miss that step even with the red bold letters. You're not alone. :p
     
    Dellgenius likes this.
  10. Dellgenius

    Joined:
    Dec 27, 2014
    Messages:
    287
    Likes Received:
    39
    I still seem to have the same problem.
     
  11. SlashnHax

    Joined:
    Dec 10, 2014
    Messages:
    3,198
    Likes Received:
    1,041
    I can try to help over teamviewer if you want.
     
  12. Dellgenius

    Joined:
    Dec 27, 2014
    Messages:
    287
    Likes Received:
    39
    Sure, when I have time. Thanks :)
     
  13. kristiaan

    Joined:
    Feb 24, 2015
    Messages:
    1,206
    Likes Received:
    203
    Thanks really needed this :) i might push my first script bot soon :D
     
  14. Arbiter

    Arbiter Mod Automation

    Joined:
    Jul 26, 2013
    Messages:
    2,937
    Likes Received:
    1,266
    Added Appendix A for OSX users, courtesy of @Eagles13.
     
  15. StuxGeek

    Joined:
    Nov 7, 2015
    Messages:
    37
    Likes Received:
    4
    How long does it usually take for a script bot to be reviewed when pushed?
     
  16. kristiaan

    Joined:
    Feb 24, 2015
    Messages:
    1,206
    Likes Received:
    203
    Really depends :) Sometimes (if @Cloud is online) within the next 30 minutes and sometimes 12-24h's :)
     
    #16 kristiaan, Nov 9, 2015
    Last edited: Nov 9, 2015
    StuxGeek likes this.
  17. kingchoco

    Joined:
    Jul 27, 2016
    Messages:
    2
    Likes Received:
    1
    I commited a "tutorialbot" to the SVN for testing. I received the auto-message that it didn't go through. So I updated the manifest a bit but it seems that it didn't work. Please help?
     
    darocoth likes this.
  18. VbHD

    Joined:
    Apr 19, 2017
    Messages:
    8
    Likes Received:
    0
  19. MakkaFlakka

    Joined:
    Nov 16, 2018
    Messages:
    8
    Likes Received:
    0
    I have created a bot through VisualRM. Now my output is a .json file.
    How do I implement this towards a java file and where exactly do I enter it? at Tortoise? I am a bit out of knowledge here as I'm a beginner in this.
     
  20. zoturen

    Joined:
    Feb 3, 2018
    Messages:
    1
    Likes Received:
    0
    Should the SVN only contain the src within Intellij or both src and out? I am getting a warning that says:
    ".class had been marked for insertion twice. This could be from a bug on our end but it more likely is caused by a bad resource entry in your manifest such as a source file existing within a declared resource folder."

    Or is this warning because something else?
     

Share This Page

Loading...